New Mars Forums
You are not logged in.
- Topics: Active | Unanswered
Announcement
#1 2023-05-02 07:16:37
- tahanson43206
- Moderator
- Registered: 2018-04-27
- Posts: 24,129
Tools - reports - evaluations - recommendations - Real Universe
For SpaceNut ....
We have several topics that contain the word "tool" but none of them provide a place for members to make recommendations about specific tools.
This topic is offered for anyone to post a report about a specific tool that they have actually used (or watched in operation).
This topic in NOT intended for posts about imaginary tools, or tools that might be useful but don't exist.
if there is need for a topic about tools that would be useful but which do not exist today, we can certainly create one.
(th)
Offline
Like button can go here
#2 2023-05-02 07:20:33
- tahanson43206
- Moderator
- Registered: 2018-04-27
- Posts: 24,129
Re: Tools - reports - evaluations - recommendations - Real Universe
Following a recommendation by ChatGPT (reported in ChatGPT topic) I decided to order a stud finder that is reported to use sound waves to find wooden studs behind wallboard. i have a magnetic stud finder, but my evaluation of the device is that it is useless. In the hands of another person, it might be useful, so I won't name the device. What I wanted was precision that ultrasound offers, and I'm willing to pay extra to obtain it.
Zircon MultiScanner A250c All-In-One Stud Finder/Metal Detector/Live AC Wire Detection and Scanner
Visit the Zircon Store
4.3 4.3 out of 5 stars 978 ratingsList Price:
FREE ReturnsStyle: A250c
A250c
A150
A200
A250
A100
Stud Sensor SL
Size: Center Finding
Center FindingEdge Finding
See available options
Brand Zircon
Batteries Required? Yes
Material Plastic
Power Source Battery Powered
International Protection Rating IP54
About this item
Ergonomically designed grip allows a comfortable hold on the tool for any size hand, at any angleACT (Auto Correcting Technology) automatically corrects common user errors, i.e. when scanning begins over a stud, as the Signal Strength Indicator help distinguish shallower targets from deeper ones
One fully charged 9V battery, not included, is required for the stud scanner to run at optimal performance to help you easily find studs, metal and live AC wiring while avoiding electrical hazards
› See more product details
Customer ratings by feature
Easy to read
4.4 4.4
Easy to use
4.1 4.1
Accuracy
3.7 3.7
Value for money
3.7 3.7
See all reviews
After the product arrives, I'll report on it's performance.
(th)
Offline
Like button can go here
#3 2024-09-30 12:37:37
- tahanson43206
- Moderator
- Registered: 2018-04-27
- Posts: 24,129
Re: Tools - reports - evaluations - recommendations - Real Universe
As reported during the recent Google Meeting, I am attempting to learn about routers. I've used a table router for simple tasks, but am now in an enviroment with a full sized wood shop with professional/industrial equipment. The proprietor of the wood shop offered to teach me the old fashioned way to use a router to follow a pattern with bits that have a roller bearing in the tip.
The project I'm interested in is to make a pistol type wooden handle for a file. Most file handles are round, and for most folks that shape is fine and they just use the tool and put it back in the drawer. I'm interested in having a handle that has more of a surface to apply forward pressure on the work piece, and have sketched a design that might work if I can figure out how to make it.
Today I pulled the router table out of it's little cubby where it sits between work sessions. I removed all the clutter on top, and all the sawdust from previous projects. I puzzled out how to pull the router out of it's mount below the router table surface. Now I'm going to have to wait for the woodshop proprietor to show me how to install and use the new bit I brought home from WoodCraft yesterday.
While cleaning the router table, I found a collection of bits that included the exact same bit I brought home from the store. That was mildly annoying, but the woodshop proprietor had forgotten about it. Tools of every description are packed into the space provided, and many have no labels. The wood shop had to vacate a large space and cram into a smaller one. It will take years to find everything, I suspect.
The next post in this series ** should ** cover setup of the router with the new bit, and how to arrange the barriers on the table top to guide the work piece.
(th)
Offline
Like button can go here
#4 2024-09-30 13:49:48
- GW Johnson
- Member
- From: McGregor, Texas USA
- Registered: 2011-12-04
- Posts: 6,174
- Website
Re: Tools - reports - evaluations - recommendations - Real Universe
If you just need to make one, cut it from a scrap of board with a simple jig saw. Then use a rasp to shape it as desired. Having a pattern to use with a router is how you make lots of them. But you might want to try it out, before tooling up to make lots of them. That's what prototyping is all about.
GW
GW Johnson
McGregor, Texas
"There is nothing as expensive as a dead crew, especially one dead from a bad management decision"
Offline
Like button can go here
#5 2024-09-30 14:22:11
- tahanson43206
- Moderator
- Registered: 2018-04-27
- Posts: 24,129
Re: Tools - reports - evaluations - recommendations - Real Universe
For GW Johnson re #4
Thanks for contributing to the Tools topic, and specifically for taking up the router question.
To bring you up to date, I'm working with a gent with decades of experience doing all kinds of woodworking.
He has NO experience with computerized anything, but he's willing to teach me how to persuade a router to follow a pattern.
The technique (apparently) involves using a special kind of bit with a roller bearing in the tip.
To attempt to gain a very basic understanding of the process, I secured two boards to each other so they cannot move while the router is working. The template has a perfectly straight edge of about 12 inches, and the goal for the exercise is to round the test piece that sits below the template.
The local WoodCraft has basic minimal CNC router machine that goes for $800. and I am interested in learning how to program it. I've spent many decades programming all sorts of machines, so from my perspective this would be just one more. However, for the woodshop proprietor, this would be a first experience with any kind of computer control.
And to catch your drift, the idea is not to make just one handle.. that would be a nice hobbyist exercise. But to make more than one, I need a pattern, so that is the immediate learning objective.
(th)
Offline
Like button can go here
#6 2024-09-30 16:02:18
- GW Johnson
- Member
- From: McGregor, Texas USA
- Registered: 2011-12-04
- Posts: 6,174
- Website
Re: Tools - reports - evaluations - recommendations - Real Universe
I think you ought to make one and try it out, before expending the resources to tool up and make a bunch. That's just prudence in a manufacturing operation. Which I did study for my PhD.
GW
GW Johnson
McGregor, Texas
"There is nothing as expensive as a dead crew, especially one dead from a bad management decision"
Offline
Like button can go here
#7 2024-10-01 15:30:04
- tahanson43206
- Moderator
- Registered: 2018-04-27
- Posts: 24,129
Re: Tools - reports - evaluations - recommendations - Real Universe
This post is to report an incremental step toward the immediate goal, which is to run the test wood against the new bit.
Today (in the absence of the woodshop proprietor) I managed to tease a straight bit out of the router chuck, and then installed the new curve shaped bit with the roller on top. The result is promising, but it is not ready for use. The new bit is shorter than the old one, so it does not rise above the top of the router table.
I have ** no ** idea how to change ** that ** configuration. This is a Bosch router, with two handles. It is designed (I gather) to be manipulated overhead. There is a trigger switch on one of the handles. That switch can be locked closed for under-table use, which is how I found it.
In the next report, I'm hoping the woodshop proprietor will be available to explain what is needed for a proper mounting.
(th)
Offline
Like button can go here
#8 2024-10-03 06:22:12
- tahanson43206
- Moderator
- Registered: 2018-04-27
- Posts: 24,129
Re: Tools - reports - evaluations - recommendations - Real Universe
Update: The solution to the positioning problem turned out to be a lever on the back side of the Router (as it is mounted in the table).
When the lever is pulled away from locked position, the router can be lifted to the correct elevation for the bit.
A new problem then arose... the opening in the router table was too small for the new bit, and the router would not run.
The woodshop proprietor fixed that (somehow), and now the router was able to accept work.
I ran the test article against the new bit (with the roller on top) and the result was the smooth rounded quarter circle I was hoping for.
The next step was to use a band saw to shape the template for the complex curved shapes of the rest of the handle. I used a floor standing sanding machine to smooth the edges, and the piece is ready for the next learning episode, which is how to (safely) guide the test article against the router to round off the curved edges.
Side note: I added four screws to hold the test article to the template, and removed the original two holder screws, because they were removed during the band saw operation.
(th)
Offline
Like button can go here
#9 2024-10-06 10:27:41
- tahanson43206
- Moderator
- Registered: 2018-04-27
- Posts: 24,129
Re: Tools - reports - evaluations - recommendations - Real Universe
Update: It turns out that a device exists to help to create complex shapes on a router while working by hand.
This accessory was not known in 1983, which is the publishing date of the Router Handbook we have on hand.
The name of the accessory is "Fulcrum Pin" and it is available for inspection on Amazon. Just enter that term in the search window.
Because our router table dates back many years, it did not contain what is now standard on modern router tables. The router tables available in modern stores or on the Internet include pre-drilled and threaded sockets for Fulcrum Pins. However, we found Metric bolts of the needed size in a local hardware, and they screwed into the pre-drilled sockets very nicely, and firmly.
The first experiments to be performed with the new Fulcrum Pin are scheduled for after the shipment of vacuum bags arrives. I used the last one while performing a first experiment with hand guided shaping. It was the danger associated with this experiment that led to discovery of the invention of the Fulcrum Pin for router tables.
Caution to any possible reader: Safety guidelines for working with a router include using a fence bolted to the router table when possible.
However, modern practice is to use a Fulcrum Pin for safety, when the fence is not practical.
Additional safety note: There are workpiece holders that provide additional safety. These grip the workpiece firmly, while the operator handle is well above the spinning tool.
It should go without saying, but anyone working with power tools needs to wear eye and ear protection, and breathing filter equipment if shop suction is not available.
(th)
Offline
Like button can go here
#10 2024-10-09 08:08:25
- tahanson43206
- Moderator
- Registered: 2018-04-27
- Posts: 24,129
Re: Tools - reports - evaluations - recommendations - Real Universe
Update .... I have completed shaping of the first complete tool handle.
The result is still pretty rough, but on the other hand, this handle could be used as is.
I'm still in need of practice in working with the spinning router tool while manipulating the work piece with respect to a "Fulcrum Pin". A big chunk of the right side of the handle went spinning off into the sunset when the router tool caught the wood at a grain. However, the ** major ** learning experience there is to cut the work piece as close to the template as possible with a band saw before starting work with the router. The less material the router has to remove, the better.
An additional insight is that maple may not be the best wood for this application, but on the ** other ** hand, maple ** is ** considered a hard wood.
I finished my first full pair of halves of a handle for the tool holder, using the "Fulcrum Pin" that I was told about by a kind employee of the local WoodCraft store. The first experiment is imperfect, as might be expected. I managed to catch the grain wrong and a big chunk of the piece went flying, so I had to cut the corresponding part out of the other half. In addition, I have a ** lot ** to learn about how to work with the "Fulcrum Pin" to avoid jerking and rough finished sections. Never-the-less, I can see that the potential is there, for success with more learning.
My 94 year old guide was kind enough to let me show him what I'd been doing, since his decades of experience did not include use of a "Fulcrum Pin". The reference books he has date back to 1983, and at that time the concept of a "Fulcrum Pin" was not yet invented.
Now all modern router tables come with build in sockets for Fulcrum Pins, and the tables come with their proprietary Fulcrum Pins.
I'll tell you this! After spending a good two hours on this first set, I am totally uninterested in doing this work manually.
Fortunately, the CNC router table is ** out there ** waiting to be funded.
***
(th)
Offline
Like button can go here
#11 2024-10-09 19:23:20
- tahanson43206
- Moderator
- Registered: 2018-04-27
- Posts: 24,129
Re: Tools - reports - evaluations - recommendations - Real Universe
This post is about wood, and specifically maple....
I ** just ** learned that there is "hard maple" and "soft maple".
I don't know which I have on hand for the initial attempts to learn how to use a table router to make complex shapes.
All I know ** for sure ** is that whatever I have is subject to imposing imperfect shapes on a work piece, if the operator is not highly skilled.
I asked Google for guidance, and as usual it came up with a number of snippets...
Search Labs | AI Overview
Learn more
…
Maple is a hardwood that is known for its density and hardness, and is comparable to other hardwoods in many ways:Hardness
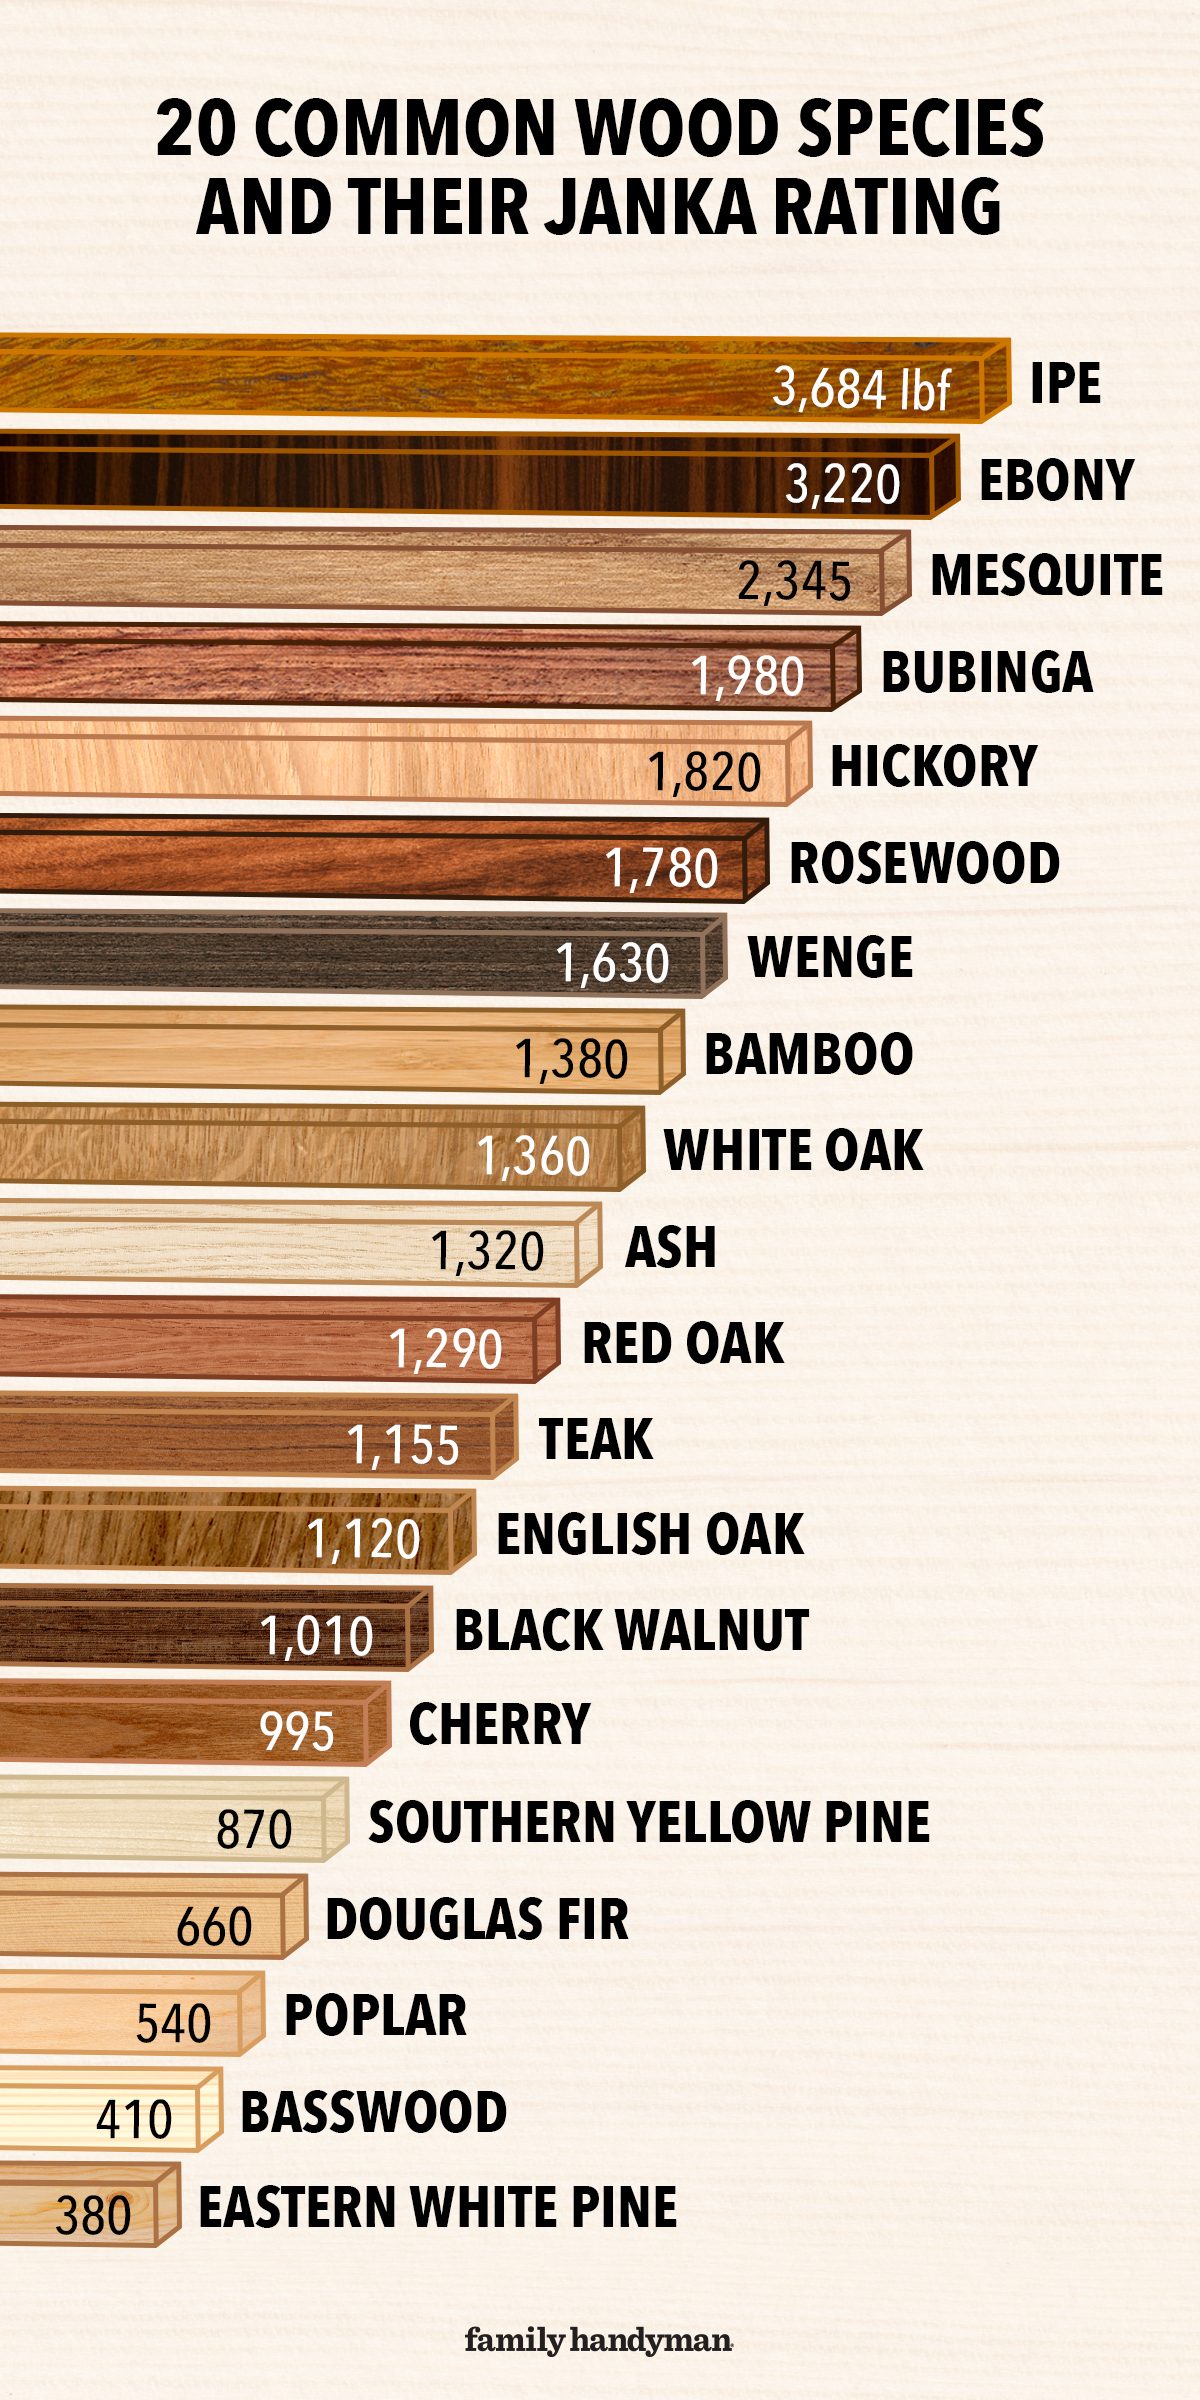
Hard maple is one of the hardest domestic hardwoods, with a Janka hardness rating of 1,450. This makes it harder than other popular hardwoods like white oak (1,360), red oak (1,290), walnut (1,010), and cherry (995).
Durability
Maple's density and hardness make it durable, strong, and resistant to wear and tear.Uses
Maple is a popular choice for flooring, baseball bats, bowling alleys, violins, and butcher blocks.Staining
Maple can be stained to look like other types of wood, such as mahogany.Firewood
Hard maple produces a good amount of heat, and is easier to split than other woods with higher heat output.Humidity and temperature
Maple is sensitive to extreme humidity and temperature changes, and can expand, contract, warp, and split.Hard Maple vs. Soft Maple - Forest Plywood
Nov 17, 2021 — Plus, it can be stained to look like other types of wood, such as mahogany that may not be as sustainable or eco-frien...Burly Beaver ·
YouTube · 4y
Differences between hard maple and soft maple kitchen cabinet doors
Dec 20, 2023 — How Much Harder is Hard Maple than Soft Maple? Despite being called soft maple, both hard and soft maple are considere...Differences Between Hard Maple and Soft Maple
The Wood Database
https://www.wood-database.com › Wood Articles
Hard maple tends to be of a lighter, more uniform color, while soft maple tends to be a bit darker, with red, brown, or gray streaks. (This is a good rule of ...
People also ask
Is maple considered a hard wood?
What wood is comparable to maple?
Is maple the strongest wood?
What are the disadvantages of maple wood?
FeedbackHard Maple vs. Soft Maple: What's The Difference?
Forest Plywood
https://forestplywood.com › blog › lumber › hard-mapl...
Nov 17, 2021 — Hard maple is more commonly found in flooring as it's denser and about 25% harder than soft maple. But, don't let the word “soft” fool you.Difference between hard and soft maple?
FineWoodworking
https://www.finewoodworking.com › Forum
Feb 25, 2009 — Hard maple is harder then soft maple ,but soft maple is not soft by any means as far as hardwoods go. SM can be a little stringy when worked with power tools.The Difference Between Hard Maple and Soft Maple
The Baillie Group
https://thebailliegroup.com › content › article › 20-hard...
Hard Maple grows at a slower rate than Soft Maple. Because of this, the growth rings on Hard Maple will be tighter than the growth rings on a Soft Maple board.
Discussions and forums
Hard vs. Soft MapleSawmill Creek Woodworking Community ·
18y ago
Pros + Cons: Hard Maple v. Soft Maple for furnitureSawmill Creek Woodworking Community ·
12y ago
Hard maple vs Soft maple?Reddit ·
r/Bowyer · 2 comments · 6y ago
See more
Videos
(th)
Offline
Like button can go here
#12 2024-10-10 13:10:23
- kbd512
- Administrator
- Registered: 2015-01-02
- Posts: 8,518
Re: Tools - reports - evaluations - recommendations - Real Universe
tahanson43206,
Hickory is pretty hard to beat, but white oak and ash are also perfectly good woods for use as tool handles. Unless there are physical appearance requirements, any of those woods are fine, so cost is what you should evaluate. Certain kinds of plywood are also quite suitable if it won't be subjected to impacts.
Offline
Like button can go here
#13 2024-10-10 14:39:50
- kbd512
- Administrator
- Registered: 2015-01-02
- Posts: 8,518
Re: Tools - reports - evaluations - recommendations - Real Universe
I would skip all the exotic and expensive imported hardwoods like ebony, bubinga, and wenge. Here in Texas, mesquite is quite common and cheap, but it also tends to have cracks in it, so as tough and dense as mesquite is, you may end up throwing a lot of it away, which won't help with cost. Realistic options are hickory, hard maple / sugar maple, white oak, and ash.
Offline
Like button can go here
#14 2024-10-10 16:18:11
- Calliban
- Member
- From: Northern England, UK
- Registered: 2019-08-18
- Posts: 4,305
Re: Tools - reports - evaluations - recommendations - Real Universe
I would skip all the exotic and expensive imported hardwoods like ebony, bubinga, and wenge. Here in Texas, mesquite is quite common and cheap, but it also tends to have cracks in it, so as tough and dense as mesquite is, you may end up throwing a lot of it away, which won't help with cost. Realistic options are hickory, hard maple / sugar maple, white oak, and ash.
You can fill cracks with epoxy glue. I have done that with oak and hawthorn before and it does produce some amazing effects if you mix dye with the epoxy. Then again, epoxy isn't cheap. And it is tough to keep it in whatever you are trying to fill long enough for it to set.
"Plan and prepare for every possibility, and you will never act. It is nobler to have courage as we stumble into half the things we fear than to analyse every possible obstacle and begin nothing. Great things are achieved by embracing great dangers."
Offline
Like button can go here
#15 2024-10-10 17:37:36
- tahanson43206
- Moderator
- Registered: 2018-04-27
- Posts: 24,129
Re: Tools - reports - evaluations - recommendations - Real Universe
Thanks to kbd512 and Calliban for your contributions to this topic!
The suggestions for alternative woods are welcome, and I will ask about them at the WoodCraft store at my next visit.
As it happened, I was in the store today, and the wide range of stock included a selection from Africa. It was packaged in the format I need for my tool handle project, so I decided to take a chance on it.
https://www.wood-database.com/african-padauk/
The material is ** supposed ** to be harder than the maple I've been using.
The rough edges of my unskilled work drew a grimace from the sales person at WoodCraft. It is abundantly clear I do not yet know what I'm doing. At least in my latest effort, the piece remained intact. Readers of this topic will recall that in my first attempt to use the router table with a "Fulcrum Pin" in place, the router caught a snag and threw a chunk of the work piece across the room.
The key learning experience from ** that ** episode was to clear as much material from the work piece using a band saw as possible. Clearly, the less work the router has to do, the better.
Even with excess material removed however, I was unable to achieve the smooth finish on the curves that I'd hoped for.
Clearly there is an art to this.
Folks who do this work for a living definitely earn their keep!
(th)
Offline
Like button can go here
#16 2024-10-11 10:08:12
- kbd512
- Administrator
- Registered: 2015-01-02
- Posts: 8,518
Re: Tools - reports - evaluations - recommendations - Real Universe
I should have been more specific about mesquite. If the wooden part in question is the size of a screw driver or saw handle, then you can quite easily obtain uncracked pieces to mill. If this tool handle is the same physical size as a pick axe handle, then there will likely be some cracking somewhere in a piece of that size. That doesn't mean you cannot find "perfect" pieces of mesquite of that size or far larger, but you'd have to pick through a number of pieces before finding that "perfect piece". This implies manual labor for sorting, which increases cost.
The other reality is that mesquite is very cheap and easy to come by, at least here in Texas. It's noticeably harder and denser than hickory (but also heavier) if that matters greatly for your application. Only relatively exotic tropical or African hardwoods have appreciably greater density and resistance to splitting / cracking / chipping / warping from hard outdoor use. These are imported and thus have much greater cost. We will likely never run out of mesquite, but those imported hardwoods are typically not very sustainable. For smaller work pieces, if you want something that's a cut above hickory when it comes to hardness / density / ultimate durability, then mesquite is your friend.
Padauk, if that is what you're using, does not score as highly on the Janka scale as hickory, let alone mesquite. However, it is definitely "better looking", in my opinion, as compared to most pieces of hickory or mesquite.
Offline
Like button can go here
#17 2024-10-11 11:23:54
- tahanson43206
- Moderator
- Registered: 2018-04-27
- Posts: 24,129
Re: Tools - reports - evaluations - recommendations - Real Universe
For kbd512 re mesquite ...
Thanks for an interesting suggestion ....
The handle I am making is similar in size and shape to the US Army 45 Caliber pistol I remember from basic training. It is shaped that way to hold a tool (like a file) and the handle shape is intended to provide greater push strength.
The work piece I start with is a flat piece that is 1/2 inch thick, 24 inches long, and about 8 inches wide. I can make 2 complete assemblies out of stock that size.
I'm looking forward to comparing the behavior of the router when dealing with the African wood, compared to the maple.
In my experiments with the Fulcrum Pin for free routing, I have learned to set the fulcrum Pin at three locations, instead of just one.
The location of the fulcrum Pin has a lot to do with the control of the work piece when engaging with the rotating router bit.
(th)
Offline
Like button can go here
#18 2024-10-11 14:43:08
- kbd512
- Administrator
- Registered: 2015-01-02
- Posts: 8,518
Re: Tools - reports - evaluations - recommendations - Real Universe
tahanson43206,
I'm sure a CNC router will do what you want done, but I think a a stock duplicator would get the job done with less time and money spent on each work piece, since there is far less setup / fixturing time involved. That said, it's your time and money, so you do it the way you think is best.
This is what I initially thought you needed, but it depends greatly on what shaping you're imparting to the handles:
Veterans-Stock Carving Duplicator w/ Router Included. Complete Machine
You need a single master piece of wood for making more stocks / handles, and then you can make as many as you want, to nearly any reasonable shape you want, using the duplicator. That's how we made gun stocks during WWII. It's also how we still make wooden aircraft propellers today, albeit using a saw blade vs a router. I suppose a router could be used to make aircraft propellers in low volumes or small sizes, perhaps for drones.
Offline
Like button can go here
#19 2024-10-12 06:13:27
- tahanson43206
- Moderator
- Registered: 2018-04-27
- Posts: 24,129
Re: Tools - reports - evaluations - recommendations - Real Universe
For kbd512 re #18
Thank you for the link to a report on the "duplicator".
This is my first opportunity to learn about what sounds like an important technology that's quietly been supporting our complex economy for many years.
Update after visiting the site...
Impressive! And I like the courtesy of including the router for those who might not have access to a store like WoodCraft!
If anyone is inspired to research the history of how this tool might have been used for mass production this topic is a good place for it.
(th)
Offline
Like button can go here